Tuesday, December 31, 2013

Iron Craft Challenge #26--Timely Crafting

More Handmade Wrapping Paper

Well, I can't believe that the end has finally come--the last Iron Craft Challenge for 2013. For this challenge, we were asked to complete our item within 1 hour. Using materials that I had left over from other projects, I decided to re-purpose some handmade wrapping paper.

One of the difficulties of being a paper artist is that people have certain expectations of you during holidays and special occasions. I had a last minute party to attend and we were playing the gift game so I had to bring an unexpected gift.

In this post, I showed you how I used my wall to expand my crafting space. Here, I showed how I made handmade wrapping paper from discarded packing supplies for Iron Craft Challenge #23--The White Challenge

Using the leftover wrapping paper that I had made for the White Challenge, I put it on the wall again so I could decorate it with more color.
Using the wall again for painting
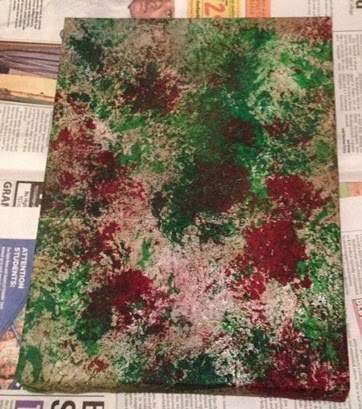
I then used Emerald Green, Pine Green and Burgundy acrylic paints on top of the white and silver paper. I then used five different alcohol inks to mute the colors (two shades of green, two shades of red, and orange).

Finished with color
In this post, I suggested that I was going to use the snow stencils in a different way.  I wrapped the gift that I was going to give away in the paper from above. I then took white primer spray paint and used one of the snow stencils from Japan to paint the stencil on top of the package.

Final product.
The gift was a hit at the party especially after I told everyone how the wrapping paper was made.

I am a little sad to see 2013 go away. It has been a great year for creating, crafting, and blogging for me. I am very happy to say that I fulfilled one of my New Year's resolutions for 2013--Finish all 26 Iron Craft Challenges. If you click on the blue label called IronCraft13 below, you will see all 26 challenges that I was able to create.


Monday, December 30, 2013

Week 52--Happy New Year


For the past three years, I have been making a New Year's card based on the Chinese Zodiac. The original reason that I started making these cards was that I didn't have time to send out handmade Christmas cards one year because I had too many commissions. Rather than not send out anything or sending out belated holiday cards, I decided to send out cards that celebrated the Chinese Lunar New Year. This gave me an extra couple of weeks to make and send out cards.

Now, I send out separate cards to people on my list for both occasions--holidays and New Year. Obviously, 2014 is The Year of the Horse.

On the inside of the card, I will provide a short history and explanation of the characteristics of this sign.

This completes this year's series of 52 cards in the Card a Week series. Please click the label WeeklyCard to view all cards in this series.


Friday, December 27, 2013

On My Bookshelf


Still reeling from the wonders of Christmas, I wanted to share with you one of my favorite holiday books--Artists' Christmas Cards compiled by Steven Heller.  There isn't much to this book other than a picture collection of Christmas cards curated by Steven Heller who was the former art director of theNY Times Op-Ed page.

There are no explanations or details--just greeting cards circa 1979. Out of print and not a must have but it still is a fun journey into the sentiments of the 1970s.


Thursday, December 26, 2013

Envelope Wrapping--Another Variation


Last year, I discussed how to use the envelope wrap (here and here). The envelope wrap is used to cover something that has very little depth. In this case, I needed to cover a calendar. BTW, the calendar shown in the instructions below are for demonstration purposes only.

Steps One through Four are identical to those explain earlier. The only caveat is that the object must be centered between the top and bottom edge.

Step One: Center the object on the paper
Step Two: Use transparent tape to secure
the hidden edge
Step Three: Use double sided tape
to the underside of the shown edge
Step Four: Bring the shown edge up and
over the object to secure the hidden seam.
Step Five is where the variation begins:

Step Five: Rather than fold both sides to the center, fold only one side using the bottom of the object as your guide. Be sure to allow some small clearance so the paper can fold upon itself.
Folding right side flap
Step Six: Fold the bottom edge up a small portion to give a clean edge. If you do not do this, your paper will splay open showing the underside of the paper.

Create a clear edge
Step Seven: Use double sided tape to the underside of the clean edge and secure. Note: Depending on the thickness of the paper you use, you might to to secure the side flap in Step Five as well.

One side finished
Step Eight: Rotate the object 180 degrees and repeat. The object is to have the flaps appearing from opposite sides of the package.

Bot sides completed
Normally, you would flip the package over so the folds would not be seen. In this case, the folds are a design element and will appear on the top side of the package.

Step Nine: Take a coordinating piece of paper and cut it so that it will wrap around the package like a belly band. The height of the band is pretty negotiable. Use what you find aesthetically pleasing or the materials you have available. Be sure to secure the band to the "clean" side of the package rather than the side with the folded edges.
Smooth side with the belly band secured
 Step Nine: You can stop here or you can continue to embellish.

You can stop here or continue
You can add a ribbon to the belly band and be done OR

you can use the flaps you have created to secure objects like those below
Eucalyptus and curly willow added
 Or even more objects
Beaded garland added

Another variation with ribbon was presented here.

I will share at least one more variation with you in the New Year. I hope you had a wonderful Christmas (for those that observe) and look forward to the New Year. Best wishes--DrRuss


Wednesday, December 25, 2013

Merry Christmas--More Present Wrapping

Merry Christmas everyone. As a celebration of the season, I wanted to share with you some of the gifts that I wrapped this year.

The first is another hand made box that was designed to hold artisinal soaps that were already wrapped and beribboned. Rather than unwrap someone else's beautiful work, I designed a box to hold everything. One of the themes that I always include is a non-traditional color design. For this box, I wanted to use a different version of green--in this case, chartreuse. I also try and include ornaments that the recipients can use on their own trees.
Top View
Side View
Another theme that I try and use is a traditional, mid-century theme--in this case, a reproduction 1950s peppermint paper with coordinating ribbon.

Peppermint wrapped present
Every year, I try and use an new technique. This year, I tried to learn how to do pleated wrapping. The hardest version is the diagonal pleat. In the future, I will use a non-patterned paper for this technique. I do like the pattern-on-pattern look of this package.

Diagonal Pleats
This is another new technique--wrapping of a calendar. I always try and use at least one nature inspired wrapping. Here the back of the package becomes the top view. On this package, there are two belly bands and two ribbons (which are really used to hold the branches).

Nature inspired wrapping
I will share the procedures on how to accomplish this wrapping later this week.

Thank you for reading and following along. I hope you have a wonderful Christmas (for those who celebrate).

Tuesday, December 24, 2013

Simple Made Difficult

Chocolate to wrap

One of my clients (who is also a dear friend) asked me if I would wrap his Christmas presents this year (this is the third year he has asked me to do so). His wife cherishes the wrappings (and saves the paper and ribbons each year) so I am always willing to fulfill his requests. He gave me five gifts to wrap and this was the first gift--three bars of quality chocolate.

First, I went to my stash of materials and decided to wrap each chocolate bar separately with tissue and ribbon. With the wrapping, I always try and blend traditional and non-traditional colors and wrapping styles. I chose orange, red and green tissue paper and peach, red and olive colored ribbons.

Raw materials
After wrapping each bar, I chose an alternative colored ribbon to bind the bind: Peach grosgrain ribbon went on the red package, olive grosgrain ribbon went on the orange package and red organza ribbon went on the green package.
Three individual packages
If I were giving these away, I would have then stacked all three packages on top one another and tied them together with a large wire-edged ribbon and gifted them as a package. Very simple and yet elegant.

Instead, since I was dealing with a friend and a fan, I decided to up the ante a little bit by creating a handmade box to exactly fit the three bars of wrapped chocolate. Once the chocolate is removed, my friend's wife will have a keepsake box to hold buttons, coins, or any other miscellany. This way, she can keep the box out during the entire year to remember the original gift.

Handmade gift box
Once the box was completed, I covered it with a sheet of paper that was screen printed by hand. The red color and the polka dots are very on trend at the moment. The top and bottom interior of the box was lined with red velvet paper.
Bottom box filled with chocolate packages
The lid could be added and gifted accordingly but I decided to make it a little bit more elegant. Once the lid was attached, I wrapped the box with a red mesh wire edged ribbon and attached two personalized ornaments to the ribbon to finish the gift.

The final product

Monday, December 23, 2013

Week 51--Christmas4


I always make a non-traditional card very year in my cut out series for those people who want something different. Although most people don't use a square card because of the extra postage required, I always try and offer at least one square card every year. This is a 5 inch by 5 inch card that just makes me smile.

This is my final Christmas design this year.

Friday, December 20, 2013

On My Bookshelf


I am always on the lookout for books dealing with gift wrapping. Whenever I am in a book store of any type, I will search the craft section and the decorative arts sections of the store. This was one of my finds at a discount book store (the great Strand Book Store) in NYC. This is a book by Espen Markussen. There are 100 wrapping ideas that are presented. This is simply a photo book of ideas and provides limited instructions on how to accomplish these designs.

This is a great book for creative motivation/inspiration for some great wrapping ideas.


Thursday, December 19, 2013

Snow Globe Fail

I have a client that wants me to make handmade snow globes to use as dinner place card holders/hostess gifts. The idea is to use a baby food jar as the base and to use NYC ornaments and glitter for the snow globe components. Before I work on the finished product, I always make prototypes to work on the process. I will now share with you my failures.

NOTE #1
Not all glitter is the same. Here I used fine glitter which tended to clump together.


NOTE #2
Use the hot setting on the hot glue gun if you are in a hurry. Use industrial strength epoxy or E6000 if you have some extra time--these two adhesives take 24 to 48 hours to set.


NOTE #3
To mimic the flow of snow, place some glycerin in the water. Too little glycerin and the glitter will drop quickly to the bottom of the jar. Add too much, and the glitter will stick to the lid.


NOTE #4
Thick glitter/holographic glitter works best. Here I used snow glitter which is a thicker glitter and seems to float nicely.


NOTE #5
If your lid leaks a little bit, run double sided tape along the lid grooves or run a bead of hot glue around the same place before twisting the lid on.


NOTE #6
Mason jars/Canning jars with locking lids and gaskets work the best. When you use these type of jars, you can fill the jar almost to the top of the jar (allowing for displacement of water due to the figurines you glue to the lid). The more water you have the smaller the air bubble you will have at the top of snow globe.

NOTE #7
If you are using a commercial jar and need to cover the writing on the lid, use an enamel type paint.

I will be sharing the completed projects for you next week.

Wednesday, December 18, 2013

Ornament Fail

Failure #1 (without flash)
One of my resolutions for 2013 was sharing more of my failures with my readers. I usually don't like to show you projects that didn't work but rather than see them as failures, I have started to look at them as processes for future successes.

I was following one of my favorite blogs and one of the contributors was having difficulty with using glitter glue to coat the inside of a glass ornament. I affectionately called the glitter glue--Poop Glitter. When you use this type of glitter it looks like poop piles and it really doesn't spread well enough to coat the interior of an ornament.

I was planning on using glass ornaments this week so I thought that I would help out. One of the options was to use acrylic ornaments but my local stores didn't have any more acrylic ornaments so I was resigned to using these plastic present ornaments.

The first experiment was to use the poop glitter that was thinned out with ModPodge. Well--this obviously did not work as evidenced above and below.

Failure #1 (with flash)
The second experiment was using fine glitter. I covered the inside of the ornament with thinned ModPodge. I let it dry until it was slightly tacky. I then poured fine art glitter inside the ornament and shook it around until it covered the ornament. While this was somewhat successful, there is still a little of the ModPodge showing. I might coat the inside with acrylic paint to deepen the color.
Failure #2 (without flash)
Failure #2 (with flash)

The third experiment was the process as #2 but instead of glitter, I used two colors of PearlEx powders. This was the most successful of the bunch but the ModPodge still shows through a little bit. Once again, I might add thinned out acrylic paint to deepen the color.

Failure #3 (without flash)
Failure #3 (with flash)
I have a couple more experiments before I finalize the process with my miniature glass ornaments.


Tuesday, December 17, 2013

Iron Craft Challenge #25--A Look Back (Kat Inspired Paper Christmas Trees)


The next-to-last challenge of this year is devoted to "looking back" at past projects as inspiration. I decided to dedicate this challenge to our director and leader--Kat. I was so inspired by her last project (Paper Snowflake Trees) that I wanted to make some paper trees on my own.

I came up with my own version by doing a cut-lace snowflake as the basis of the branches. I did a red version (above) and wasn't quite as pleased as I would have liked. The four layers are attached to a skewer and is mounted on a wooden oblong bead.

In the red version, I cut out the lace snowflake, divided it into half, and then mounted them to the skewer by gluing the overlap onto itself. The difficulty with this particular version is that the branches are asymmetrical and therefore the tree looks lopsided.

For the second version, rather than cut the snowflake in half--I only cut out one section of the snowflake so that the branches would be symmetrical around the skewer. The overlap was glued onto itself and then the skewer was pierced through the center of the rounded snowflake.

Glittered branches
Top most branch (most glitter)
To add interest, I applied snow glitter before gluing the pieces together. The snow glitter was applied in different thicknesses. In other words, the topmost layer got the most "snow" and the lowest layer got the least.

Aerial View
Side View