Saturday, March 30, 2013

Eggs 9: Last Minute Eggs

Today's post is group of last minute decorations that you can do when you are in a bind and need to come up with something for Easter Sunday. These ideas could work on blown eggs or cooked eggs (mostly) and can work on dyed, colored or white eggs.

Option 1: What to do with those broken eggs? Either make Cascarones or fill them up with something.


Option 2: Be cute. Add something, draw something or doodle on your egg. Sometimes googlie eyes are all you need.


Option 3: Add sparkle. If you have a crafter in the house or a little girl, you probably have these stick on rhinestones around.


Option 4: Pressed Flowers. Simply add dried flowers, leaves or ferns. A little spray glue makes this simple work.


Option 5: Add your kid's stickers. If you have a scrapbooker or a kid in the house, you probably have all kinds of stickers at your disposal. You might have to add some release cuts for larger stickers but they are pretty easy to use.


Friday, March 29, 2013

Eggs 8--Pollack Eggs

Today, I want to share with you the process by which I make Pollack Eggs. There are very simply to do and is a great alternative to dyeing Easter Eggs. I wouldn't eat these eggs since you are using acrylic paints.

Supplies:
Blown Out Eggs
Skewers/dowels
Poster Putty
Acrylic Paints (use the cheap ones--I used Liquixtex Basics)
Cling Film (I used Saran Wrap)
Storage Container for drying
Styrofoam Plate (I know these aren't environmentally friendly but they work the best for mixing paints)

Step One: Preparing Supplies
Place your poster putty on a skewer about half way down and place egg on skewer
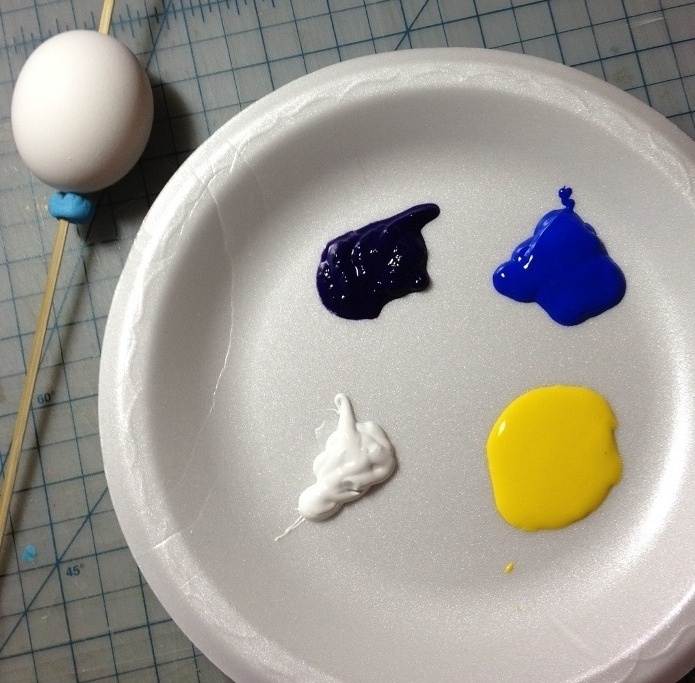
Prepare your palette of paint. I usually use four colors (dark, medium/bright, and white). Squirt a dollop of each color on your plate. Be sure they are close enough to each other so they can mix.
Step One--I forgot to take a picture of the palette illustrated below
Step Two: Layer One
Take a piece of cling film and ball it up so that paint can stick to a surface. Dab the ball in the darkest color and dab onto the egg. Use an up and down motion (similar to stenciling). You want to lift straight up so you don't smear the paint. Cover most of the egg with this color but try and let some of the white show through.

First Color: Purple
Step Three: Layer Two
Find a clean portion of the film and ball it up. Dab the ball into one of the medium colors. Cover most of the egg with this color.
Second Color: Orange
Step Four: Layer Three
Remove the egg from the skewer and replace the egg so that the bottom is the new top. You will probably have a white spot where originally the egg rested against the putty. Turn the cling film inside out so that the first two colors are inside the ball. Dab the ball into the second of the medium colors. Use this color as a highlight. At this point you can reintroduce any of the previous colors if they seem to be hidden/missing.

Third Color: Yellow
Step Five: Layer Four
Find a clean spot on the cling film and make a ball. Dab the ball into the white paint and lightly add highlights along the egg to brighten up the egg or to show a resemblance of the white egg.

Final Color: White

The Final Egg
Step Six; Drying
Place the skewer and egg in a place to dry in the open air. This shouldn't take long since you didn't use a lot of paint. Place the skewer across the storage container to allow to dry.

Pretty Eggs Drying

Blue, Kelly Green, Emerald Green and White

Red, Orange, Pink and White

Blue, Green, Yellow and White

Overall, I am very happy with the way that these eggs turned out. I use this same technique when I make handmade wrapping paper using white butcher paper and acrylic paints. Rather than use cling film, I use plastic shopping bags as the daubers.

This is a really fast project and you can paint a lot of eggs very quickly. All for of these eggs took less than 20 minutes to do and most of that time was finding the paints and setting up the palette. The paint palettes stay fresh for a long time and this is an easy (but messy) way for kids to get involved with painting eggs--especially since there is no wrong way to do this. If you need to step away from your paint palette, take a slightly damp paper towel and rest it over the plate until you return.

Tomorrow, I will be sharing with you some last minute egg decorating you can do if you procrastinated and waited to decorate this year.

Eggs 7--Coffee Filter Eggs


Today's eggs are brought to you courtesy of coffee filters. I found a huge sale on coffee filters at the dollar store. I wanted to do a tie dye type of effect by dipping the coffee filters in the dye and then wrapping them around the eggs to dry.

These didn't turn out exactly the way that I expected them but they were a wonderful surprise anyway.

Supplies Needed:
Egg dyes (I used both food coloring and coloring paste)
Cheap Coffee Filters (I found some to be more fibrous than others so use the cheap ones)

Step One:
Fold the coffee filter in a random fashion. There is no rhyme or reason here.
Partially dip the filter in one color. (best if the darker color is used first)
Entirely dip the filter in a second color. (best if a lighter color is used)

Dyed Coffee Filters
Step Two:
Unfold the coffee filter.
Separate the layers of the coffee filter
Place egg inside coffee filter and wrap the filter entirely around the egg
Set aside to dry--I let mine dry overnight

Step Three:
Unwrap the dried egg.
You can leave as is (with a white background)

Optional: Overdye in a color of your choice (I think a vastly contrasting color works best. Run the overdyed egg under water to remove most of the color and hand dry with a paper towel.

Note: If you leave the egg in the color wash too long, the original design will disappear. Therefore, it is better to simply add a basic color wash (i.e., a short time in the dye) and then remove most of the color.

Second Note: Once the coffee filters have dried you can use them in some other crafty paper project. Don't throw them away!


Here are the Coffee Filter Eggs (bottom row) and the Pollack Eggs (top row).

Thursday, March 28, 2013

Eggs 6--Washi Egg Fail


As promised in previous posts, I will share with you my successes and failures as part of my New Year's Resolutions. Last night, I tried to make a Washi Egg which are traditional in Japan. The results were 50/50.

Rather than start with a blown out egg or a wooden egg which is traditionally done, I decided to use a papier mache egg that I bought at the local craft store. I bought many of them because this is a technique that I really want to master. The problem that I have with washi eggs is that there are many templates available but they are egg specific. In other words, the templates fit a certain size egg and as many of you know, eggs are not all the same size. Even when they are labeled the same size, there are variations.

By using a papier mache egg, I could design a template specific for that egg and then reproduce it because all of these eggs are somewhat identical.

The first mistake that I made was that I didn't use Japanese paper. I had this scrap of paper left from a previous project so I decided to use it. Big mistake. This is a paper manufactured in India and it is not as flexible as Japanese paper. Therefore, there were a lot more creases in the paper when trying to stretch and mold it around the curves of the egg.

The second mistake that I made was that the points that meet on the top where too sharp and thin. To minimize the amount of bulk at the top and bottom of the egg, you need to narrow your cuts so they meet rather than overlap. My cuts were much too drastic and should have been curved rather than straight cuts.

Tonight, I will post another example of a painted egg--an easy technique that I call Pollack Eggs.

Wednesday, March 27, 2013

Eggs 5--More Rubber Cement Eggs

Eggs, Eggs, Everywhere


Here are more eggs drying on The Hedgehog. As you can see every skewer is occupied which is about three dozen eggs drying. Yesterday, I showed you rubber cement eggs that were drying before they were put in their color bath.  Here are the eggs after their initial color bath and with the rubber cement removed. As is, I think that they are very pretty but I wanted to add another layer of color.

Rubber Cement Eggs after first color wash
After removing the rubber cement after the initial color wash, I decided to dye them in a lighter pastel color wash. The initial color washes were primary colors of purple, green, blue and red. I decided to add a layer of light orange, pink, light green and chartreuse to receive the bottom four eggs.

All of the rubber cement eggs.
In order from left to right on the bottom row:
Purple and pink = egg #1 in the previous picture
Red and orange = egg #4 in the previous picture
Green and light green = egg #2 in the previous picture
Blue and chartreuse = egg #3 in the previous picture.

Overall, I am very happy with the way these turned out. I would make more of these if they weren't so time intensive. While easy, it takes a little time removing the rubber cement after dyeing although it can be rather therapeutic.

Iron Craft Challenge #7


This week Kathy over at Just Crafty Enough asked me to host Challenge #7--Oh, the POWER. I don't know if I can hold it together enough to get through this post but I will try.

After talking back and forth about some ideas, I was given the choice between two suggestions that I made. I won't reveal which options that I had because I might want to use them in the future, if I am deemed a successful host and IF I am allowed to host again in the future--Oh, the PRESSURE.

So dear fellow crafters, the topic for Challenge # 7 is (drum roll please)--ETHNIC CRAFTING! Say WHAT? What on Earth does that mean?

For this challenge you are to create something dedicated to, or inspired by, a country other than your own. You have the widest latitude here. It could be a craft from another country: Like Origami. Kirigami or Washi Dolls from Japan; it could be an inspiration based on something popular in another country--like Delft Blue and White from the Netherlands; OR it could be something based on the culture of another country: Mexico's Day of the Dead celebrations.

These are only suggestions to get you started.

Reveal day is Tuesday, April 9th. Please post only in-progress photos before that date. Tag photos with IC137 and IronCraft.

Some Inspiration (All images from Yahoo! Images)

Sugar Skull Stencil Art (Mexico--Day of the Dead)
Origami Paper Ball (Japan)
Washi Paper Dolls (Japan)
Kirigami Based Greeting Cards (Japan)
Happy Crafting.

Tuesday, March 26, 2013

Eggs 4--Rubber Cement Eggs


Today is one of the rare days this week with a double post. I want to continue to update you with the progress and techniques that I am using this week for decorating eggs. I posted earlier today regarding my Iron Craft Challenge. Tomorrow morning, I will have a morning post regarding the Iron Craft Challenge that I am hosting. Tonight and tomorrow night, I will be posting more egg decorating.

Today's project are what I call Rubber Cement Eggs. The concept is similar to the Liquid Frisket that is used in watercolor painting. In watercolor, you draw your design and the parts of the design that you do not want a background color wash to cover is covered with liquid frisket. It creates a bond that does not allow the color to seep through. It is the same concept as using masks in stamping. Because of the expense and waste involved with this procedure when dealing with decorating eggs, I use rubber cement rather than liquid frisket. It is much more affordable and readily available. My brand of choice is Elmers. Be sure to use a fresh bottle because once it doesn't become liquid it is hard to use for this type of project.

Supplies:
Rubber Cement (I used Elmers)
Blown Out Eggs
wooden skewers or thin dowels
Poster Putty (this is that putty that you use to put up light weight items): I used Blue Stik. Any brand is fine.
Two food containers that are wider than your skewers (smaller one is the gluing container, larger one is the drying container)
Adhesive Remover/Eraser

Note: You can do this with hard boiled eggs but they are much more difficult to maneuver when applying the rubber cement.If you want a similar technique for boiled eggs, use rubber bands or string and cover the eggs before dyeing. The areas covered by the rubber bands/strings will be white.

Step One: Assembling your gluing station
Assemble your gluing station. I put my materials on top of a pizza box so it would be elevated a little bit. You want the shortest distance between your glue jar and your gluing container. Take a small piece of the Poster Putty and make a ball. Run the skewer through the putty until it is about half way down the skewer. The distance is negotiable. You simply want the egg to be somewhere away from the lip of your drying container.

The gluing station
Step Two: Covering the Eggs
Place an egg on the skewer and gently push the egg against the putty. This will keep one end of the egg steady. Lift the application brush out of the glue jar and wait until there is a steady stream of glue. Quickly move the brush so that the stream of glue starts to drizzle over the egg. Rotate the egg in all directions so that the glue covers the egg. Use a random motion to add more interest to the design. Do not brush the glue onto the egg. Every place where the glue appears will be white once you color the egg. 

I usually only use one application of glue. Once the glue does not stream/drizzle from the brush, I stop. You can easily add another dip into the jar and continue if you want. I do this gluing over the small container so it can catch any stray glue. This will also catch the glue in that small time when you are transferring the brush from the bottle to the egg.

Step Three: Let the Eggs Dry
Place the skewers over the larger container so each end of the skewer is over an edge of the container and let them dry completely. I usually let mine dry overnight but as long as the glue is not tacky you can dye them.


Drying station
Step Four: Dyeing the Eggs
You can color these in a variety of ways. If I want the white to show through, I tend to color them in lighter and pastel colors (see the top picture). Allow to dry.

Remove the rubber cement. Take an adhesive remover (it is like a big eraser and can be found in the scrapbook section) and remove the dried rubber cement.

If you want a two color egg, dye the eggs in a darker color and allow to dry. Remove the rubber cement and dye the egg in a light color. The lighter color will change all the areas that were originally white and covered by the rubber cement.

I will have examples of the two color eggs tomorrow.

Iron Craft Challenge #6--The Eggotine

For this challenge we were tasked to work with Peeps. For those fortunate souls out there without access to Peeps, you got to create something inspired by Peeps. Many people already know my aversion to anything Peeps and with that annoying commercial airing right now (with the one cute kid espousing all about the wonderfulness of Peeps), I could about puke. I don't like to eat them and I especially don't even like to touch them. So today, I decided to create an Eggotine.

Step One: Take a pretty papier mache egg and cover it with a beautiful piece of Washi. This was practice for a later project.

Pretty Washi Covered Egg
Step Two: Utilize a Bunny Peep. It looks like the bunny is looking inside the egg. I wonder what he found.

Cute Bunny Butt in the air
 Step Three: Activate the Eggotine--An Egg Guillotine.

Oh shucks--Bunny got his head chopped off
You will never realize how much fun I had making this. This still makes me chuckle every time I see it. I think that I have been watching to many crime dramas because I had to get the blood splatter patterns just right.

Monday, March 25, 2013

Eggs 3--Striped (Taped) Eggs


Here are the results of the striped eggs that I mentioned yesterday. There were a variety of different levels of success but overall I would have liked there to be more distinction among the stripes. One of the beauties of working with this technique is you can over-dye the eggs if you don't like them. The different types of tape that I used just didn't seal very well. You can tell by looking at the egg in the center. I used masking tape and drafting tape for this project. In the past, I used auto-detailing tape and it worked wonderfully. I wasn't prepared this year and forgot to order it so I was looking for some substitutions.

Today, I am a little haphazard because I am working on three projects at the same time. I needed to post this entry, blow out more eggs for another project and I am getting ready to start a new project based on resist dying of eggs. I will attempt more striped eggs using a different tape, but I also will be using rubber cement to make patterns on the white eggs before dying them with a base coat.

Plus, I am hosting the Iron Craft Challenge #7 and I have still yet to finish my own Iron Craft #6 Challenge but I already know what I am going to do so it is just a matter of executing it.

Sunday, March 24, 2013

Eggs 2--Modern Cascarones

Today, I wanted to continue keeping you up to date with my Eggs Week. Today, I started dying the eggs for the first project--Taped Eggs. To start with these eggs, you adhere tape or stickers to the white egg. You then color the eggs. When the tape is taken off, the white of the egg shows through. You can then dye them a second time to get a two toned colored egg.

I decided to add some new colors using the traditional food coloring. The colors are shown below.

New color station
Step Two-- Getting ready for the second stage.
 While the eggs were drying, I decided to complete the cascarones. I assembled the supplies that I needed to complete the task. Here are the supplies: 2" hole punch, bone folder, glue stick, glue/acid brush, sharp scissors, confetti, and an egg cup.

Rather than cut circles, I simply use the  hole punch to cut the circles. The confetti is made from recycled streamers from the theater that has been sent through the shredder.

Supplies for the cascarones
 I place the egg in the egg cup to hold it steady and then fill it up with confetti. I tend to pack the confetti into the egg until it is pretty full.

Stuffed egg ready for its top.
 The next trick is to cut out the circles (done with a hole punch). I then cut 8 slits into the circle. The first four are N, S, E and W. and then I cut in between them to get the eight cuts. It is best not to cut too deep into the paper--I usually cut about 1/8th inch.

First set of cuts
The final step is to glue the circle over the opening in the egg. Most people use glue stick but I prefer to use a wetter medium like Elmer's Glue or PVA. I like the wet glue because it makes the paper relax and stretch which helps when covering the hole and for stretching the flat paper over the rounded surface of the egg.

The final product.
 Rather than using crepe/tissue to cover the openings, I decided to use paper scraps from previous projects and I tried to match the scraps to the color of the eggs.


Saturday, March 23, 2013

Eggs1

This is a rare weekend post but I wanted to continue with the Egg Week and to keep you up to speed with my preparations. Along the way, I wanted to share with you some of the shortcuts that I am taking with the decorating of the eggs.

The first set of eggs that I will be working on are the Modern Cascarones mentioned earlier. Along the way, I wanted to share with you some of the the specific tools and processes that I use. The first new tool that I wanted to share with you is my drying rack. I have two drying racks. The first is the drying rack for the newly washed and emptied eggs described here. It is made from a egg carton and is used for the sole purpose of drying the white eggs. The reason that this won't work for the dyed eggs is because it isn't preferable to have the dyed eggs touching each other when drying. To help with this dyed egg drying process, I use a plastic colander that is turned over on a newspaper lined cookie sheet. This makes the drying rack mobile and I can move it out of the way while the eggs are drying. As you can see, I have bamboo skewers placed into the holes of the colander so the eggs can dry without touching each other. I can fit 30 eggs per colander. 


The second trick that I use to expedite the dying process is plastic 18 oz cups that are labeled with masking tape to indicate the color combination used for each dying color. I only dye 8 eggs at a time so I can do other things while the eggs are resting in the dye.  I fill each cup with 3/4 water, a teaspoon of vinegar, and the color paste from Williams Sonoma.  For me, the vinegar adds a deeper and richer color when it interacts with the color paste.

I always dye the cascarones first because I can gauge how well the color is holding and how long to keep the eggs in their color bath. Since the tops of the eggs will be cover with some material after they are stuffed, it is a great way to test out your dyes.


 The mottled/marbled eggs that appear on the bottom of the colander are hand dyed with Dr. Ph. Martins Water Color Concentrate. I use the eggs after they have come out of their base color. I then put color in cling film and then wrap the cling film around the egg. I leave the cling film on the egg for several minutes. I then take off the cling film and use it to marble the eggs and to take off the excess water color concentrate.


The eggs will dry overnight and I will continue with the cascarones and fill them tomorrow.