Showing posts with label Easter Egg. Show all posts

Friday, March 25, 2016

Paper Faberge Easter Egg


The theater hosted an Easter Egg Decorating contest. We had to use the template that was provided so this is what I decided to do. I have always been infatuated with Faberge Eggs with their decoration, cutout windows, and jewels so I decided to do a paper version.

This is a three layer egg that has two  hinges that allows the view to open it like a book. The first view is the entire egg closed. This allows to view all three layers simultaneously. The top layers features a Moroccan inspired doodle. Because of the black card stock, I used gel and/or metallic pens.
All three layers
The top layer opens to the left. Underneath is a polka dot inspired egg with two different colored crystals. The smaller window allows a peek onto the third layer.

Second layer
The second layer opens to the right to reveal the bottom layer. This layer is a geometric flower design with crystals used as the flower centers. Both the positive and negative spaces are filled with two different patterns. The flower petals are filled in with white doodles. The negative space is filled with gold doodles.


The hardest part of the endeavor was working out the mechanics of the size and placement of the openings. Working out the hinges took some time as well. As you can see, there are spacers used to lift the eggs off of the crystals so each layer would lie flat. Overall, 174 Swarovski crystals were used.

The mechanics of the eggs.

I will provide an update once the winners are chosen.


Tuesday, May 12, 2015

Iron Craft 2015 Challenge #9--Dragon Eggs


For this challenge we were asked to do something "faux." I took the challenge on a different direction. Rather than create something that looked like something else (faux painting, faux metalwork, etc). I decided to go with something that is truly fake--in other words, something that doesn't exist (well at least MAYBE doesn't exist).

I decided to make dragon eggs (a la Game of Thrones Dragon Eggs).

I took some leftover goose eggs that I have been hoarding for Easter Eggs and covered them with decoupage paper (which is a very thin glassine type paper). I used techniques similar to washi eggs but instead, I simply cut the fringe as it was attached to the egg. I will provide a tutorial when time allows. I went with wild prints to add to the fantasy of Dragon Eggs.

I wonder what type of dragons will hatch from these beauties.

Tuesday, April 14, 2015

Iron Craft 2015 Challenge #7--D is for Decoupage (Eggs)

Decoupage Eggs (Washi Eggs)
I really struggled for this challenge in that I couldn't decide what I wanted to do. I thought about dinosaurs. I thought about dragons. I thought about doing another cut out but this season of Iron Craft, I wanted to start doing other projects without falling back to cut outs.

I was walking through the local craft store and I saw some decoupage sheets and Mod Podge so I decided to do something with decoupage. Since it was Easter, I decided to revisit these washi eggs. I have chronicled my attempts at washi eggs here, and here, and here.

I finally listened to my own advice and only used Japanese Washi Paper. Rather than use Mod Podge, I decided to use traditional bookbinder's paste. This paste dries clear and does not leave a gloss coat to the paper.

The first egg was a real duck egg that was blown out. Duck eggs are slight larger than chicken eggs. They are little more pointed at the top than goose eggs.
Real Duck Egg
The second egg was a real goose egg that was blown out. Goose eggs are a 1.5 times larger than duck eggs and almost 2 times larger than chicken eggs.

Real Goose Egg
The third egg was a paper mache egg that I had left over from a previous project. They claim that it is a goose egg but in reality it is between the size of a goose and ostrich egg.

Paper Mache Egg

I am getting closer to standardizing the process so I will be able to adapt to the size of the egg. I am getting fewer wrinkles and less bulk at the ends of each egg. Maybe by next Easter, I will have conquered the process.

Monday, March 10, 2014

Egg Decorating 2014--Silk Egg Dyeing


This year, I wanted to share some new techniques for Egg Decorating. These will be new techniques for me and I will share the prototypes and finished projects with you. The first technique is Silk Egg Dyeing. It is a hot dyeing process and requires that you use 100% silk for the process.  This technique was made famous by using old silk neckties.

So, for the prototypes, I used some old silk ties that were being discarded at a local Salvation Army. Since the ties were so out of style, the manager gave them to me. She told me that she got tired of having them around and only be used for Halloween or 70s costume parties. One of the ties that she gave me has been bought and re-donated twelve times.

For the prototypes, I decided to use raw chicken eggs (as opposed to blown out eggs). For the final project, I will use blown out eggs. I will share a tutorial with you later this week but wanted to show you some of the finished prototypes.

As you can see, only some of the pattern transfers. Regardless of how hard I tried to get the fabric to lie flat against the egg, I still got white or missing patterns. Once I tried and failed on this single issue, I just decided to embrace the imperfections as part of the process. To lessen the effects of this lack of transfer, I decided to overdye the eggs with standard cold dyeing techniques. Afterwards, I really like the way the eggs turned out. I tried to overdye with a coordinating color.

In the detail photos below, you can see the pattern transfer on each of the eggs.

Silk dyed eggs
(using old neckties)
Egg Detail
(the yellow egg is a simple
cold dyed egg)
Egg Detail
Egg Detail
Egg Detail

I am especially proud of the brown eggs (which is an extremely difficult color to achieve without it looking like mud). I learned another interesting technique this year as well--the sheen on the eggs is a thin coat of vegetable oil.

As mentioned above, I will share the tutorial later this week and will share more final results.


Thursday, April 4, 2013

Washi Egg Part 3


I don't know why I am obsessing with making these eggs. Did you ever have one of those projects where you were so close to completely nailing it but it was just out of reach? For me, this is it. I am so close but there is still some fine tuning that I would like to do.

I should have listened to my own advice and used Japanese paper again but I decided to use this scrap of marbled paper instead. Once again, the paper wasn't as malleable as the Japanese paper (due to the lack of cotton content of the marbled paper) but it worked much better than the Indian paper.

I should have perfected the process but experimenting. Now for some fine tuning. Hopefully, I won't run out of eggs before I get it all down.

Tuesday, April 2, 2013

Washi Egg Part 2


Today, I wanted to share with you my second attempt at making a washi egg using a papier mache egg.  The first egg was a larger egg and I bought several of those to work with but I decided to try one of the smaller eggs because (1) I have more of them, and (2) I thought that the smaller size would actually be easier to work with. I am definitely glad that I did. 

I would rate this attempt a 20% failure as opposed to the 100% failure of the first attempt.The measuring of the paper and the cutting of the paper are the most difficult. This time, I almost got it right. One of the lessons that I learned on this attempt is that you can measure a little too long and cut off the ends as you need to rather than come up short like I did.

A second lesson is to definitely use Japanese paper because it is extremely flexible when wet. It is much easier to stretch the paper where you need it to go.

A third lesson that I learned was to use a very busy pattern (which most washi is anyway). The busy pattern hides many of the wrinkles and seams that you might get.

A fourth lesson that I learned is to completely paste down the center section between the cuts and wrap the entire egg around the middle with paper. You leave the cut edges loose and unglued. This way, you can align the paper so that it doesn't get crooked and it adds a stabilizing element. Then you glue 3 or 4 strips at a time until you are done with one end of the egg (I will provide a diagram once I have completely figured out the logistics of the process).

The bottom of the egg--almost made it

The top of the egg--a better attempt.
I could cover that up with a drilled hole and ribbon

I am very happy with the attempt and have started to develop a set of guidelines to use when covering any sized egg. Now there are some smaller details to work out--namely, how to minimize the wrinkles, how to work better with the glue, and how to perfectly finish the top and bottom of the egg. I might actually have it on the third attempt.

Getting closer to the perfect egg.


Saturday, March 30, 2013

Eggs 9: Last Minute Eggs

Today's post is group of last minute decorations that you can do when you are in a bind and need to come up with something for Easter Sunday. These ideas could work on blown eggs or cooked eggs (mostly) and can work on dyed, colored or white eggs.

Option 1: What to do with those broken eggs? Either make Cascarones or fill them up with something.


Option 2: Be cute. Add something, draw something or doodle on your egg. Sometimes googlie eyes are all you need.


Option 3: Add sparkle. If you have a crafter in the house or a little girl, you probably have these stick on rhinestones around.


Option 4: Pressed Flowers. Simply add dried flowers, leaves or ferns. A little spray glue makes this simple work.


Option 5: Add your kid's stickers. If you have a scrapbooker or a kid in the house, you probably have all kinds of stickers at your disposal. You might have to add some release cuts for larger stickers but they are pretty easy to use.


Friday, March 29, 2013

Eggs 8--Pollack Eggs

Today, I want to share with you the process by which I make Pollack Eggs. There are very simply to do and is a great alternative to dyeing Easter Eggs. I wouldn't eat these eggs since you are using acrylic paints.

Supplies:
Blown Out Eggs
Skewers/dowels
Poster Putty
Acrylic Paints (use the cheap ones--I used Liquixtex Basics)
Cling Film (I used Saran Wrap)
Storage Container for drying
Styrofoam Plate (I know these aren't environmentally friendly but they work the best for mixing paints)

Step One: Preparing Supplies
Place your poster putty on a skewer about half way down and place egg on skewer
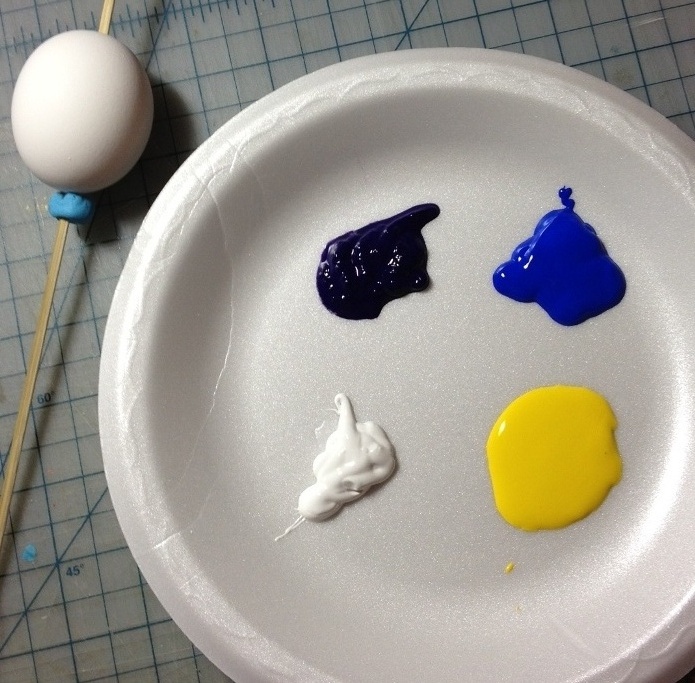
Prepare your palette of paint. I usually use four colors (dark, medium/bright, and white). Squirt a dollop of each color on your plate. Be sure they are close enough to each other so they can mix.
Step One--I forgot to take a picture of the palette illustrated below
Step Two: Layer One
Take a piece of cling film and ball it up so that paint can stick to a surface. Dab the ball in the darkest color and dab onto the egg. Use an up and down motion (similar to stenciling). You want to lift straight up so you don't smear the paint. Cover most of the egg with this color but try and let some of the white show through.

First Color: Purple
Step Three: Layer Two
Find a clean portion of the film and ball it up. Dab the ball into one of the medium colors. Cover most of the egg with this color.
Second Color: Orange
Step Four: Layer Three
Remove the egg from the skewer and replace the egg so that the bottom is the new top. You will probably have a white spot where originally the egg rested against the putty. Turn the cling film inside out so that the first two colors are inside the ball. Dab the ball into the second of the medium colors. Use this color as a highlight. At this point you can reintroduce any of the previous colors if they seem to be hidden/missing.

Third Color: Yellow
Step Five: Layer Four
Find a clean spot on the cling film and make a ball. Dab the ball into the white paint and lightly add highlights along the egg to brighten up the egg or to show a resemblance of the white egg.

Final Color: White

The Final Egg
Step Six; Drying
Place the skewer and egg in a place to dry in the open air. This shouldn't take long since you didn't use a lot of paint. Place the skewer across the storage container to allow to dry.

Pretty Eggs Drying

Blue, Kelly Green, Emerald Green and White

Red, Orange, Pink and White

Blue, Green, Yellow and White

Overall, I am very happy with the way that these eggs turned out. I use this same technique when I make handmade wrapping paper using white butcher paper and acrylic paints. Rather than use cling film, I use plastic shopping bags as the daubers.

This is a really fast project and you can paint a lot of eggs very quickly. All for of these eggs took less than 20 minutes to do and most of that time was finding the paints and setting up the palette. The paint palettes stay fresh for a long time and this is an easy (but messy) way for kids to get involved with painting eggs--especially since there is no wrong way to do this. If you need to step away from your paint palette, take a slightly damp paper towel and rest it over the plate until you return.

Tomorrow, I will be sharing with you some last minute egg decorating you can do if you procrastinated and waited to decorate this year.

Eggs 7--Coffee Filter Eggs


Today's eggs are brought to you courtesy of coffee filters. I found a huge sale on coffee filters at the dollar store. I wanted to do a tie dye type of effect by dipping the coffee filters in the dye and then wrapping them around the eggs to dry.

These didn't turn out exactly the way that I expected them but they were a wonderful surprise anyway.

Supplies Needed:
Egg dyes (I used both food coloring and coloring paste)
Cheap Coffee Filters (I found some to be more fibrous than others so use the cheap ones)

Step One:
Fold the coffee filter in a random fashion. There is no rhyme or reason here.
Partially dip the filter in one color. (best if the darker color is used first)
Entirely dip the filter in a second color. (best if a lighter color is used)

Dyed Coffee Filters
Step Two:
Unfold the coffee filter.
Separate the layers of the coffee filter
Place egg inside coffee filter and wrap the filter entirely around the egg
Set aside to dry--I let mine dry overnight

Step Three:
Unwrap the dried egg.
You can leave as is (with a white background)

Optional: Overdye in a color of your choice (I think a vastly contrasting color works best. Run the overdyed egg under water to remove most of the color and hand dry with a paper towel.

Note: If you leave the egg in the color wash too long, the original design will disappear. Therefore, it is better to simply add a basic color wash (i.e., a short time in the dye) and then remove most of the color.

Second Note: Once the coffee filters have dried you can use them in some other crafty paper project. Don't throw them away!


Here are the Coffee Filter Eggs (bottom row) and the Pollack Eggs (top row).

Thursday, March 28, 2013

Eggs 6--Washi Egg Fail


As promised in previous posts, I will share with you my successes and failures as part of my New Year's Resolutions. Last night, I tried to make a Washi Egg which are traditional in Japan. The results were 50/50.

Rather than start with a blown out egg or a wooden egg which is traditionally done, I decided to use a papier mache egg that I bought at the local craft store. I bought many of them because this is a technique that I really want to master. The problem that I have with washi eggs is that there are many templates available but they are egg specific. In other words, the templates fit a certain size egg and as many of you know, eggs are not all the same size. Even when they are labeled the same size, there are variations.

By using a papier mache egg, I could design a template specific for that egg and then reproduce it because all of these eggs are somewhat identical.

The first mistake that I made was that I didn't use Japanese paper. I had this scrap of paper left from a previous project so I decided to use it. Big mistake. This is a paper manufactured in India and it is not as flexible as Japanese paper. Therefore, there were a lot more creases in the paper when trying to stretch and mold it around the curves of the egg.

The second mistake that I made was that the points that meet on the top where too sharp and thin. To minimize the amount of bulk at the top and bottom of the egg, you need to narrow your cuts so they meet rather than overlap. My cuts were much too drastic and should have been curved rather than straight cuts.

Tonight, I will post another example of a painted egg--an easy technique that I call Pollack Eggs.

Wednesday, March 27, 2013

Eggs 5--More Rubber Cement Eggs

Eggs, Eggs, Everywhere


Here are more eggs drying on The Hedgehog. As you can see every skewer is occupied which is about three dozen eggs drying. Yesterday, I showed you rubber cement eggs that were drying before they were put in their color bath.  Here are the eggs after their initial color bath and with the rubber cement removed. As is, I think that they are very pretty but I wanted to add another layer of color.

Rubber Cement Eggs after first color wash
After removing the rubber cement after the initial color wash, I decided to dye them in a lighter pastel color wash. The initial color washes were primary colors of purple, green, blue and red. I decided to add a layer of light orange, pink, light green and chartreuse to receive the bottom four eggs.

All of the rubber cement eggs.
In order from left to right on the bottom row:
Purple and pink = egg #1 in the previous picture
Red and orange = egg #4 in the previous picture
Green and light green = egg #2 in the previous picture
Blue and chartreuse = egg #3 in the previous picture.

Overall, I am very happy with the way these turned out. I would make more of these if they weren't so time intensive. While easy, it takes a little time removing the rubber cement after dyeing although it can be rather therapeutic.

Tuesday, March 26, 2013

Eggs 4--Rubber Cement Eggs


Today is one of the rare days this week with a double post. I want to continue to update you with the progress and techniques that I am using this week for decorating eggs. I posted earlier today regarding my Iron Craft Challenge. Tomorrow morning, I will have a morning post regarding the Iron Craft Challenge that I am hosting. Tonight and tomorrow night, I will be posting more egg decorating.

Today's project are what I call Rubber Cement Eggs. The concept is similar to the Liquid Frisket that is used in watercolor painting. In watercolor, you draw your design and the parts of the design that you do not want a background color wash to cover is covered with liquid frisket. It creates a bond that does not allow the color to seep through. It is the same concept as using masks in stamping. Because of the expense and waste involved with this procedure when dealing with decorating eggs, I use rubber cement rather than liquid frisket. It is much more affordable and readily available. My brand of choice is Elmers. Be sure to use a fresh bottle because once it doesn't become liquid it is hard to use for this type of project.

Supplies:
Rubber Cement (I used Elmers)
Blown Out Eggs
wooden skewers or thin dowels
Poster Putty (this is that putty that you use to put up light weight items): I used Blue Stik. Any brand is fine.
Two food containers that are wider than your skewers (smaller one is the gluing container, larger one is the drying container)
Adhesive Remover/Eraser

Note: You can do this with hard boiled eggs but they are much more difficult to maneuver when applying the rubber cement.If you want a similar technique for boiled eggs, use rubber bands or string and cover the eggs before dyeing. The areas covered by the rubber bands/strings will be white.

Step One: Assembling your gluing station
Assemble your gluing station. I put my materials on top of a pizza box so it would be elevated a little bit. You want the shortest distance between your glue jar and your gluing container. Take a small piece of the Poster Putty and make a ball. Run the skewer through the putty until it is about half way down the skewer. The distance is negotiable. You simply want the egg to be somewhere away from the lip of your drying container.

The gluing station
Step Two: Covering the Eggs
Place an egg on the skewer and gently push the egg against the putty. This will keep one end of the egg steady. Lift the application brush out of the glue jar and wait until there is a steady stream of glue. Quickly move the brush so that the stream of glue starts to drizzle over the egg. Rotate the egg in all directions so that the glue covers the egg. Use a random motion to add more interest to the design. Do not brush the glue onto the egg. Every place where the glue appears will be white once you color the egg. 

I usually only use one application of glue. Once the glue does not stream/drizzle from the brush, I stop. You can easily add another dip into the jar and continue if you want. I do this gluing over the small container so it can catch any stray glue. This will also catch the glue in that small time when you are transferring the brush from the bottle to the egg.

Step Three: Let the Eggs Dry
Place the skewers over the larger container so each end of the skewer is over an edge of the container and let them dry completely. I usually let mine dry overnight but as long as the glue is not tacky you can dye them.


Drying station
Step Four: Dyeing the Eggs
You can color these in a variety of ways. If I want the white to show through, I tend to color them in lighter and pastel colors (see the top picture). Allow to dry.

Remove the rubber cement. Take an adhesive remover (it is like a big eraser and can be found in the scrapbook section) and remove the dried rubber cement.

If you want a two color egg, dye the eggs in a darker color and allow to dry. Remove the rubber cement and dye the egg in a light color. The lighter color will change all the areas that were originally white and covered by the rubber cement.

I will have examples of the two color eggs tomorrow.